
He gets 100% of the credit for these images!

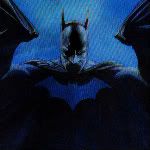
Here is Jax007's original fan-submission thread where you can check out some amazing pencil art. I brought this into IllustratorCS2 to make it a live paint object. This gave me editable paths and the ability to color the areas of the pic. Then I used photoshop to do some minor edits and shading. This is my 3rd digital painting I've ever done, which took about 2 days to complete!
Coloring before shading was done.

Here is the thread for another of Jax007's work. This was my FIRST ever digital painting, created in a similar fashion to the image above short of a few new tricks I figured out later. This took about 3 days to color and shade, while in the learning process.
If anybody talks to jax pass him the link here... I'm not sure if he posts here anymore, and it would be cool to hear his opinion. It would be appreciated!
peace
So IllustratorCS2 color draws easily?

It's Vector? or still bit map?
What changes or options do you get by converting it to a paint object?
I use illustrator a lot, but this term doesn't ring a bell for some reason.
Bleed, live paint is new in CS2 and its amazing! It creates vector lines that you can edit to make corrections or whatever you need. Here are some shots to give you a real quick rundown of setting this up.
1 - 2 - 3 - 4 - 5
Here is the picture before shading in photoshop too.
I wonder if you can paint like in Photoshop, but have it be Vector.
Like an oil painting you can scale any size you want.
Something like this
Yea no prob bleed! You can actually also convert color pictures too! I did a very quick 16 color tracing. You can see a selection and how the areas are picked when you hover them. You are able to adjust the number of colors as well as area size to increase the detail. Heh, i think this is kinda what you were talking about.
peace
Oh btw, it shoud be </a> not <a/>... that'll mess up your links
I was thinking of actually painting, not converting.
But this is close enough.
I think u should get some credit for that tutorial BTW!

 lmfgdao\/vO0t!
Instead of all smooth shading, you could combine that with some hard shades of color.
Like in anime
You could also shade with colors from reflected light.
Use some of the background and surrounding colors for shading.
Just experiment with that.
Also find a light source and shade all the characters according to it.
There can be more than one light source.
Like the shine from a blade could cast a light on a character.
Bye, Bye Bitches.
Talent much?
Great ideas Bleed! For the girls image i had just been using only the colors to get my selections shown below. In the other picture i hadn't done this and you can see some mistakes where i had gone out of the lines... and... yea...

Then I'd basically use burn and dodge for shades and highlights. I realize this kidna takes away from the "comic" look, but it's all I really know how to do lol. Are these still the tools you would use, or do you brush other colors, maybe blending modes? Havent tried it yet but I've read radial gradients could be useful as well...
Thanks again for the help!
peace
You should paint the other part of Deception Character. JAX007 did 2 arts with them. Would be awesome.
Nice job.
If I'm going to do a serious color job, at the end, I delete the line art and just leave the colors with the shading.
Top layer = line drawing set to multiply with lowered opacity.
Have some "layers" with the base colors at the bottom of the stack set to normal mode.
Above that I start with my shading layers.
I do 80% of shading in black and white on separate layers.
These shade layers are set to deferent blending modes, depending on the result I want.
Overlay
multiply
color
Sometimes I have like 6 layers of different parts of my B&W shading.
I set them to different opacities to get different results.
Above those layers I start to add color variation layers.
This is where you add background colors projecting on to the characters body.
I add some random colors too, just to give it some variety.
Then if I want to add some texture, like bump mapping or pores, whatever.
I find pictures online of rocks, walls, meat, wood and so on.
What ever picture I look for depends on what kind of texture I want to add to the area I'm working on.
I set these pictures to black and white sometimes and set the layer style to overlay, soft light, or whatever looks good.
If I want to sharpen my shading lines. (If it's looking too blurry)
Go to Filter>Liquify
This gives you a pinch brush, expand, and a move brush.
It lets you bend lines without blurring them.
(It makes a grid under the drawing. You actually edit the grid lines which end up deforming the drawing)
The Liquify filter is one of my favorite tools in PS.
for blending, I use a soft air brush, set to a low opacity, the smudge tool and blur some times.
dodge and burn help too for fine details. Like a shadow in the corner of the eye, or a shine on the tip of a nose.
You've always been a big help to me, and I really appreciate it!
Thanks for the tips, it'll give me lotsa new stuff to practice. You knew i'd eventually ask about texturing, eh?
peace


You probably weren't going for textures but I just wanted to see what it looked like:
http://img53.imageshack.us/img53/3646/texturized9vz.jpg
The matt looking texture you put an the other stuff looks too flat.
It's too easy to recognize it as a standard PS texture.
Texturing is not as easy as it sounds.
You need to make it invisible in a manner of speaking.
You need to see it, but it shouldnÂt stand out as looking odd.
For example, the texture you put on the characters clothing is flat and the characters bodies are curved and the cloth is also curved.
You need to re work the texture to match this as much as possible.
This means editing the texture map / maps by hand.
There are some instances in which you don't need to curve the texture to make it look 3D, but you have to know when that's the case.
Basically, just look at it and say to your self, does this look right?
I know, it's harder than it sounds.
The Liquify filter might help you to make the texture look like it's wrapping around the characters.
-------------------------------------------------
I'd like to know how Jax007 goes about drawing hands.
I like the way he draws them.
I can draw them too, but it's a pain to make them look right.
Especially with perspective shots.
(edit) I figured out a trick that makes drawing hands a lot easier and faster. "For me" = Less than 20 seconds to draw a hand in any pose.
1 = draw the palm with a box or a basic shape resembling it.
2 = Draw a ball for the Meat of the thumb. If you see the inside of the palm.
3 = Draw 3 division lines on the box, where the fingers come out from.
4 = Lightly draw quick lines for a quick pose of the fingers. = like wires.
(Step 4 can be skipped if you want)
5 = Being careful not to make the fingers too long, use ovals to draw every part of the fingers. = one finger = 3 ovals.
Always draw the ovals from the foreground to the background. (Draw the one you can see the most, and then draw the ones behind it if the fingers are bending in perspective.)
Step 5 made an instant difference in my hands when I was practicing last night .
Then erase Sindel and Limei from the one Jay colored.
If you do that, you will keep only the textures for Sindel and Li Mei. The rest will be covered by the untextured drawing.


